
Looking for some aerial photography tips? You’ve come to the right place!
I’ve been shooting aerial photos using drones for years, but never really ventured into shooting aerials from full sized helicopters or planes. I decided to give it a shot in November of 2017 as I really wanted to try shooting with a proper camera from a higher altitude (I’m still a huge fan of drone aerial photography, but there is just something about the color and sharpness that comes out of a high end full frame DSLR that is still tough to beat).
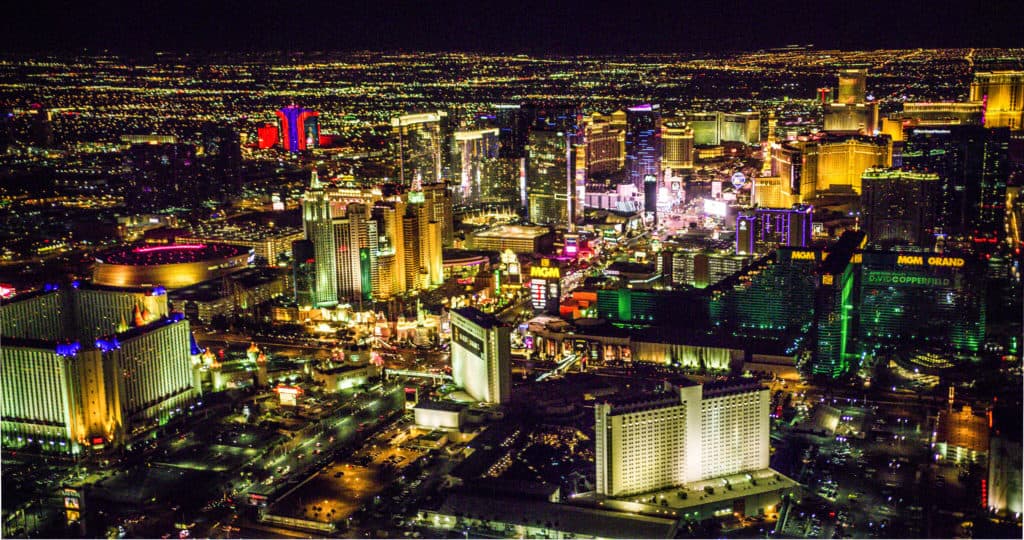
So I booked a Las Vegas sunset flight with the FlyNyon crew. There are a number of helicopter tour companies in the area. FlyNyon advertises doors-off helicopter flights for photographers, so I signed up with them.
Although I booked a sunset flight with them, it had to be cancelled last minute as they did not have enough passengers for the flight. They instead moved me to an 8 PM night flight from their Boulder City base (about 15 minutes outside of Las Vegas), and then flew me into Vegas to see the strip.
Turns out it was actually better bang for the buck, as the sunset flight left from McCarran airport (right near the strip) and was only 15 minutes in length. The flight from Boulder City was about half an hour long as it took some time to fly into the city and all the way to the strip (cost a little more as I had a pricey Uber ride there and back, but overall definitely worth it).
My initial plan was to just take my Canon 5dMark3 along and a Canon 16-35 f/4 IS lens. I didn’t want to be fumbling around with two cameras and lenses for my first flight, so that was the combo I had settled on.
Then at the “11th hour” I decided I may as well rent the best-of-the-best for the flight and ended up renting a RED Weapon with Helium 8K sensor from BlackWood Camera in Vegas. My idea was to run the camera pretty much for the duration of the flight and pull still photos from the video (at 8K resolution the sensor puts out twenty four 30+ MP RAW photos per second!).
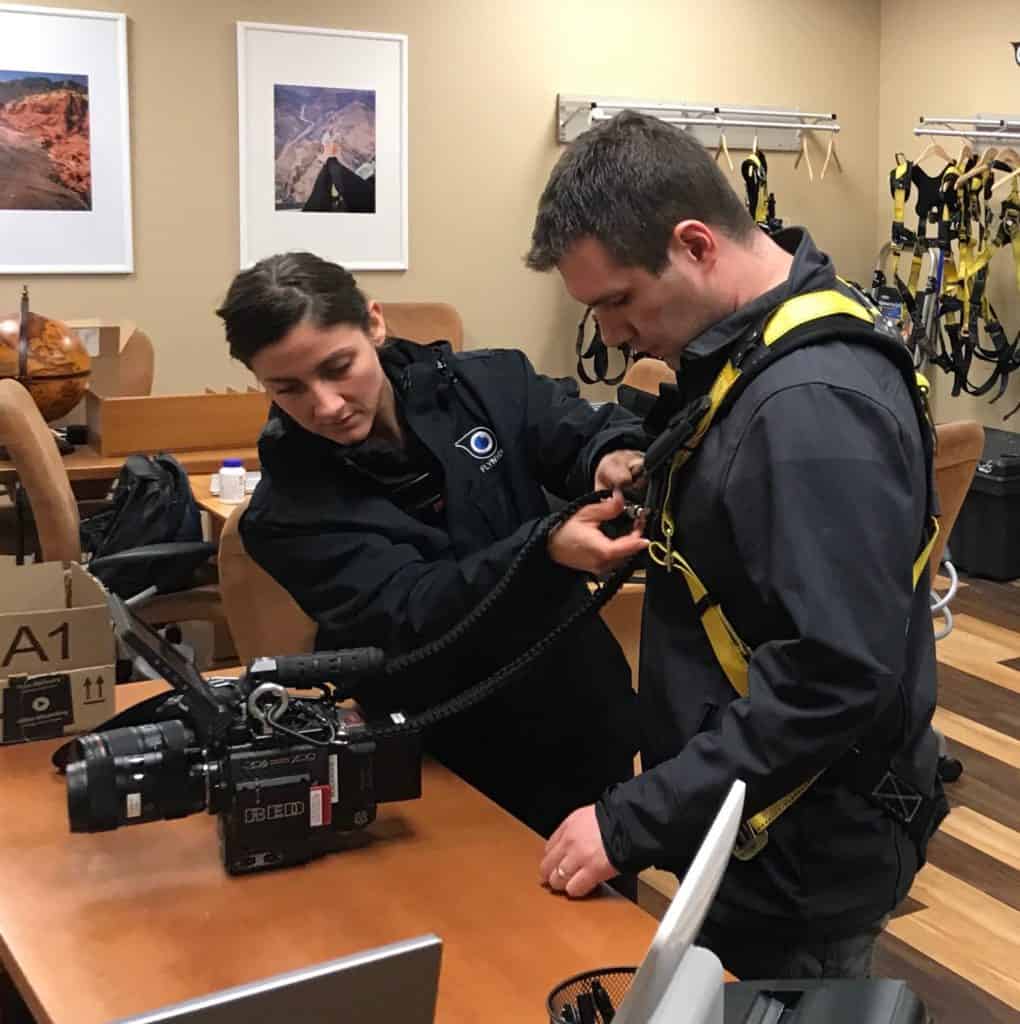
I used a Sigma Art 18-35 f/1.8 lens on the RED camera as per the recommendation from BlackWood camera (GREAT company by the way). I figured this would give me a similar field of view as my Canon 16-35 and it was highly rated and recommended.
Now don’t get me wrong, it was an incredible experience. But I made a number of mistakes and I want to share them with you so you don’t make the same ones.
Mistake #1: Renting a camera I was completely unfamiliar with for my first flight.
The RED Weapon is an absolute beast of a camera. It has some of the highest dynamic range of any camera on the market and some of the best color technology on the planet. However I was only used to shooting Canon DSLR systems, and the RED Weapon is set up completely different than a Canon DSLR.
The folks at Blackwood Camera spent the better part of the afternoon explaining the ins-and-outs of the RED Weapon to me and I was quite comfortable shooting with the camera in the confines of their office.
Once I was in the air and under the pressure of a short clock things didn’t go quite so smooth…
For one, it does have autofocus, but as it is mainly a cinema camera it is poorly implemented, especially on 3rd party lenses. Autofocus on Canon cameras is amazing, especially on their flagship models, and would have been better suited to this flight.
In a well lit room yes the RED would focus, but even then fairly slowly and not extremely accurately. Out of the helicopter I couldn’t get it to autofocus, so I switched to manual.
Now normally I am pretty good with manually focussing a lens, but when hanging out of the side of a helicopter being HAMMERED by the rotor wash and wind it was a bit of a disaster. The helicopter also shook like crazy and it was difficult to check if I had sharp focus prior to pressing the record button.

As a result, many of my shots were OK but not tack sharp like I like them to be.
If/when I do it again, I will definitely be using either my Canon 5d Mark 4 or by that time hopefully my Canon 1DX Mark2. I know these systems inside and out and their MUCH smaller and more familiar form factor would have been a great thing to have for the helicopter flight.
If I ever have the luxury of shooting with a Shotover Gimbal system I would of course choose the RED Weapon over a Canon setup. Stabilized, the RED cameras put out some of the most amazing video I have ever seen.
I wanted to make a few camera adjustments during the flight but was fumbling through menus and just struggling to make it work like I wanted it to. Maybe if I had a week or two with the camera prior to the shoot things would have gone a little differently, but at this point I was not yet comfortable enough with the camera to make quick adjustments like I could on my Canon DSLRs.
Lesson learned: If it is your first time shooting aerial photos in a helicopter and you are on a time crunch, take a camera and lens that you are familiar with.
Mistake #2: Not using an image stabilized lens (or body).
I thought my shutter speed of about 1/250 on the RED (pretty much the max I could go before I was too far underexposed) would be enough to eliminate the shake, but it turns out it wasn’t…
Not using a stabilized lens (or at least a stabilized sensor like in the Sony systems) was a BIG mistake. I knew the helicopter ride would be bumpy, but I had no idea HOW rough it would be. The Sigma lens I had on the RED was not stabilized but like I said I was hoping to get enough shutter speed that it did not matter too much.
Nope.
I’m sure if the doors were on the helicopter it may have been a different story. But with 3 of 4 doors off (only the pilot had her door on) it was incredibly windy and rough inside the cabin. As soon as I stuck my lens past the edge of the door frame the rotor wash was so intense I could not hold the giant RED camera still even if my life depended on it.
The folks that I flew with were using Sony A7RIII cameras and were getting tack sharp photos (due to a combination of solid autofocus and a stabilized camera sensor). On the ground the RED Weapon would have destroyed a Sony in pretty much any metric. Shooting from the air/handheld/at night/with no doors the Sony (or Canon/Nikon equivalent) would have been much preferred.
Lesson learned: Take an image stabilized lens with you for a helicopter flight. Alternatively, use a body that has a stabilized sensor like the Sony lineup.
Mistake #3: Not dressing warm enough.
I’m from Southern Alberta. Although I’m not a fan of the cold I find 15-20 degrees Celsius plenty warm (it was about 18 degrees Celsius about an hour prior to the flight when I checked). I figured my spring jacket would and a long sleeved T-shirt would be plenty for the flight.
Not even close.
Dress WARM. With the doors off and the rotors blasting air downwards at a few hundred kilometers an hour any heat you may have under your jacket disappears FAST.
Wear a few layers and a wind proof jacket with some insulation. Something with a high collar would be nice as well. I found myself quite cold after about 5 minutes, even with higher ambient temperatures.
If you are flying mid-summer in 25-30 degree Celsius temperatures on a sunny day you are probably fine in a jacket and shorts. Anything lower than that and things cool off quickly.
As geeky as it would look I think a pair of goggles or close-fitting safety glasses would be a good idea. With the wind ripping through the cabin I found my eyes tearing up a lot making focussing on the small RED Weapon screen even more difficult.
Lesson learned: Dress warmly with a few layers and a solid jacket. You can always open up a jacket to cool down, but it is tough to warm up in the air when you don’t have enough clothes on. Also consider some form of eye protection or shielding.
Mistake #4: Not wearing proper shoes.
Who knew?! Last thing on my mind for this excursion was the shoes I would wear. I wore the same slip-on Skechers I have been buying/wearing for the past few years, didn’t think it would be an issue.
Boy was I wrong.
On this flight I was in the passenger side (left) back row on the outside of the helicopter. The plan was that a few minutes after takeoff I would rotate outwards, and the fellow who was beside me would get down on the ground and put his legs on the skids (he would sit where my legs were). This would give him and I a chance to shoot with no obstructions.
About 5 minutes into the flight the pilot told me to swing my legs outside of the cabin so the other fellow could assume his position on the floor. I stuck my left foot outside of the cabin and IMMEDIATELY kicked it back inside.
As soon as I had stuck my foot outside the edge of the door the rotor wash promptly sucked the back of my shoe right off of my foot. At this point the blood had drained from my face and to be honest I was fairly terrified of losing my shoes for the rest of the flight. I still break out in cold sweats thinking about what might have happened had it been sucked right off and struck the tail rotor or hit somebody on the ground after falling a few thousand feet…
Lesson learned: WEAR PROPER LACE-UP SHOES, and make sure they are tight! I did mention it to the FlyNyon crew after the flight and they assured me they would be carefully checking this on passengers travelling with them in the future.
Mistake #5. Taking two cameras on such a short flight.
Because I did not want to miss out on any shots on the flight, I ended up taking both the rented RED Weapon and my trusty Canon 5dMark3. My thought process was that I would shoot primarily on the RED Weapon and use the 5D Mark 3 to shoot some “behind the scenes” stuff and use it as a backup to the RED.
I should have stuck with one or the other. Everything is tethered to you on these flights so that nothing falls out of the heli, however it makes it quite awkward to switch cameras. This is ESPECIALLY true when using a giant camera such as the RED along with the smaller Canon.
Now if I was using two smaller Canon bodies I was very familiar with I would say take both a wide-angle and a telephoto lens. But the bulk of the RED didn’t allow for much movement in the cramped cabin and made it difficult to swap with the Canon camera.
Lesson learned: Stick with one camera and a high end zoom or prime. If you have done a few heli flights and are comfortable with your main camera by all means add a second camera with a different focal length.

My first helicopter flight taught me many things, but those are the five major learning points. I have a number of aerial projects scheduled for this summer and here is a list of a few things I will be doing differently in addition to what I learned on the FlyNyon Vegas flight:
- Pay a little more and book a sunset flight, even if it means paying for an empty seat. Don’t get me wrong, seeing the Vegas strip at night was pretty cool. But of all the aerial photos I have seen of Vegas (and any other big city for that matter) it seems that the sunset ones are always a little more appealing. Not to mention the extra shutter speed that a sunset flight will allow…
- Use some form of stabilization in addition to the built in camera/lens stabilization systems. Although rigging up a Ronin or Movi in any helicopter is a bit of an ordeal, I want to look into the Kenyon Gyro systems a little more, as well as the new DJI Ronin-S which would be an ideal size for a heli flight. If/when I do this I will definitely be doing a writeup on this.
- Find a heli pilot experienced in flying photographers. After discussing this flight with a number of industry professionals a few of them mentioned that it is very important to find a pilot who knows how to “trim” a helicopter. Apparently this can make a HUGE difference between a smooth heli flight and a bumpy one. Anyone reading this that know more about this sort of thing please feel free to comment!
- Take along a high resolution camera. Sure, if you are just shooting for Instagram/Facebook you will find that pretty much any half decent DSLR will do the job. If you are like me and you like seeing your work in print I would recommend going for something 30-50 MP. There is SO much detail in some of these cityscapes, and when you are printing enlargements or putting together a photo book the extra sensor resolution can really bring out some of this detail. Of course, make sure your technique is solid so that your photos are sharp or the extra resolution won’t matter.
I hope you found something of some use in this post. I will continue to add to it as I think of more things. If you have any aerial photography tips I would love to hear from you?
Please feel free to comment below!
Thank you!